Review/Swatches/Video: Revlon Colorburst Lacquer Balms

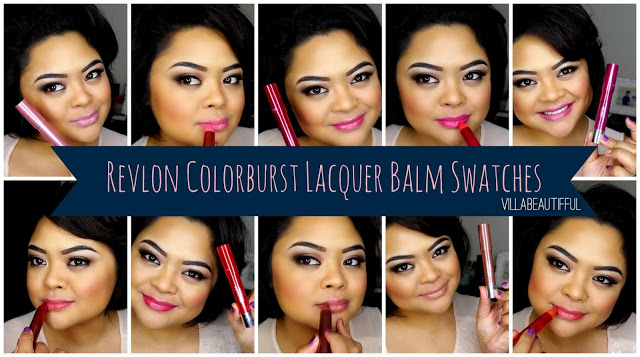
Ok, I just had to.. really I did! Now I feel my collection is complete - 10 Matte 10 Lacquer.  If you missed out on my matte swatches/review/video click

HERE

.   Of course my husband thought I was crazy but he should be use to it by now.  The lacquer balms are so moisturizing! I just love the way they glided on my lips and didn't feel they were going to slip off. Is is just me or does a lot of the colors all look the same on me? Wish they would have made some deeper darker shades for the fall/winter season and saved the brighter ones for spring/summer.  The color on the packaging can be very deceiving as you will see in the video and in the swatch pictures below. 

Watch my review/swatch video!

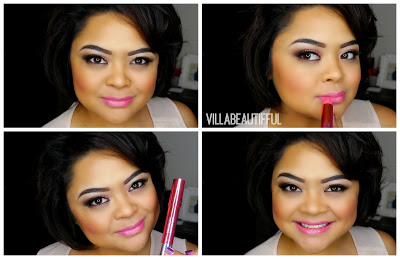
Here are some pictures of me wearing the colors.  I am a medium/dark skin tone (MAC NC40-42, Makeup Forever #128, Urban Decay Naked Foundation 6.0, Smashbox Studio Skin Foundation 3.1)

Revlon Colorburst Lacquer Balm 105 Demure

Nude light pink 

Revlon Colorburst Lacquer Balm 110 Coquette

light brighter toned pink that has more of a blue undertone.

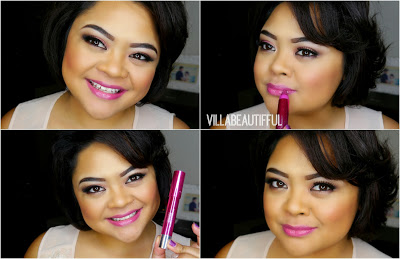
 Revlon Colorburst Lacquer Balm 115 Whimsical 

pinky purple color

Revlon Colorburst Lacquer Balm120 Vivacious 

creamy hot pink

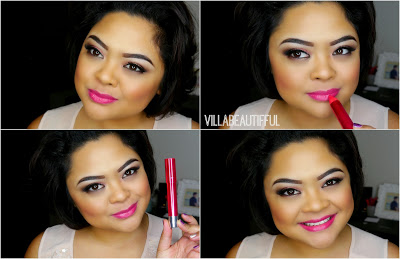
Revlon Colorburst 125 Flirtatious 

bright but lighter toned fuchsia

 Revlon Colorburst Lacquer Balm 130 Tease

peachy pink orange (coral)

 Revlon Colorburst Lacquer Balm 135 Provocatuer 

bright-pinky red 

 Revlon Colorburst Lacquer Balm 140 Coy

mauvy brown

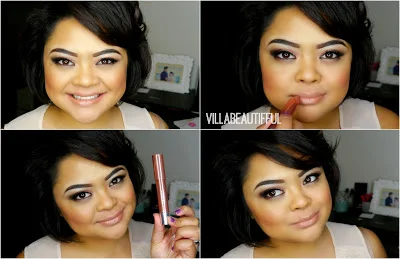
 Revlon Colorburst Lacquer Balm 145 Ingenue

nude medium brown

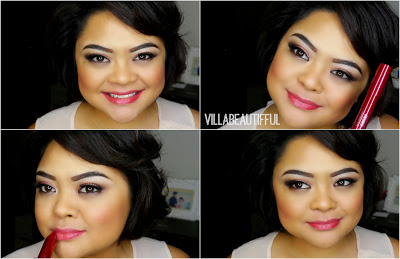
Revlon Colorburst Lacquer Balm 150 Enticing

deeper medium red

I want to know what you guys are currently obsessed with? Do you want to see some swatches of other products? Let me know! Oh and if you are GOOGLE+ please add me :D

Oh man, I totally forgot to let you know that I did do a video on the makeup that I am currently wearing in the review/swatch video.

/www.villabeautifful.com/llabeautifful.com/2013/11/tutorialget-ready-with-me-shimmer-rose.html

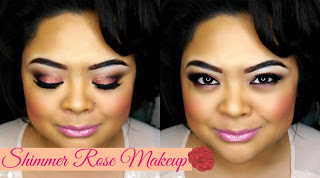
Click the picture to be taken to the blog post! 

Tutorial/Get Ready With me - Shimmer Rose Makeup with MAC Rose Pigment

Last weekend I was cleaning out my makeup collection and I came across MAC Rose Pigment.  I totally forgot about this color and I remember it use to be one of my favorite pigments.  It is a beautiful pinkish golden infused pigment.  I really wanted to use this color for a tutorial since I need to add some "colorful" looks for my Youtube channel.

I have been getting so many requests for more videos.  I give a lot of credit to the beauties who can produce and edit a couple of videos a week and at the same time be able to manage everyday life.  It's like a 2nd job to blog, film, and post.  I recently made a schedule for myself - every Thursday 1 YouTube tutorial and at least a couple times a week for posts.  So far I've been able to do this without any problems.   It's such a great feeling getting so much support from you guys, I appreciate it so much! It really makes me want to do more and more, and I am working so hard to give you guys what you want! :) So instead of video where I talk the whole time I might as well do a "getting ready with me" makeup video.  At least you can see how I achieve a full look.  The speed is pretty fast but you can pretty much see all the steps that I am doing. I am interested how you guys like this ...

The list of all the products that I used for this look:

Eyes:

MAC  Soft Brown Eye Shadow

MAC  Sketch Eye Shadow

MAC Shadowy Lady Eye Shadow

MAC All That Glitters Eye Shadow

MAC  Phloof Eye Shadow

MAC Rose Pigment

MAC Twinks Eyeshadow

Motives Allure Paint Pot Mineral Eye Shadow

Rimmel Scandal Eye Waterproof Kohl Kajal Eye Liner

Motives Liquid Eye Liner

House of Lashes Doll Face Lashes

Face:

Smashbox Photo Finish Foundation Primer

NYX Cosmetics 06 Natural Beige

MAC Studio Fix Fluid NC40

MAC NC25 Studio Finish Concealer

MAC NC45 Studio Finish Concealer

Motives Runway Blush

Sleek Face Contour Kit Medium

Lips:

Urban Decay Naked Glide On Lip Liner

NYX Cosmetics Nude Truffle Lip Liner

Motives Pink Sand Rich Formula Lipstick

Motives Rose Mineral Lip Shine

Brushes with brownish beige handles - Hair and Makeup Addiction

MOTD: Blue/Orange Colorful Eye

 I just love the

Morphe Brushes 

35 Color Glam Palette!! Look how pigmented the colors I used to create this look. First I used NYX Cosmetics  Jumbo Eye Pencil in Electric Blue to make the lid color really pop. I just applied this on top of my eye shadow primer that I use regularly. I really like the NYX Jumbo Eye Pencils because they come in a variety of colors to enhance your lid shadow. The lashes are

Alter Ego Lashes

in  Pixie Dusters. Of course I had to add just a tiny bit of glitter to my inner tear duct -

Eye Kandy Cosmetics

glitter in Confetti. I love Confetti because it's a silver holographic that can be worn with any color combination.

I've been so behind at posting some new content! To be caught up with me and my makeup adventure you can find me on INSTAGRAM -- VILLABEAUTIFFUL (don't forget the double FF's!)

Tutorial: My Eyebrow Routine - easy, waterproof and long lasting

I decided to make a tutorial on a question that I get asked a lot - "how do you do your eyebrows? or "what products do you use for your eyebrows?" To tell you the truth I hate doing my eye brows.. yes I hate doing them.  If you have been following me from the very beginning you can tell my eye brows went through a transformation.  When I first started MOTD's on Instagram I  didn't really pay much attention to my brows, maybe just a light fill in but that was about it. There's just something about me and my brows.  I do not have a problem doing brows on other people, but on myself is a whole different story.  Since I was a teenager I have always been self conscious about my eyebrows.  I was the culprit of over tweezing my brows or being complete opposite of not doing anything with my brows.  Then BOOM the eyebrow Gods came to me and I was determined to have nice defined brows that I see all over Instagram.  After going through a few products I found the ones that worked the best for me.

Now it's time to watch the video, I make it easy I promise

Products used: 

Makeup Forever Aqua Brow Corrector 30

Anastasia Beverly Hills Brow Wiz Brunette 

MAC Studio Fix Concealer NC30

MAC Mineralize Concealer NW30

Would love to know what other tips/tricks you would like to learn!

Wedding Tiffany and Cody Video Trailer by Solefire Films and wedding thoughts

Hi everyone!

Just received our wedding video trailer by our videographer Nolan from

Solefire Films

.  Wanted to share it with all of you! It was such a magical day and Nolan captured it beautifully.  All the details that are included in the video were all made by me.  So happy how it turned out.  Can't wait to see the whole video. 

Just click the picture to be taken to the full trailer.

http://vimeo.com/78438551

It's been a couple months after our wedding and I miss everything about wedding planning and executing.  Yes, for some it may sound a little bizarre.   I guess when something so big like this takes over your life for almost a year you really don't know what to do after.  Every time I watch this trailer it makes me feel so proud of all the little details that I made for our wedding. Making trips to the craft store almost every other day, antique shopping every weekend, having our condo filled with wedding stuff truly made the whole wedding experience compete.  All my hard work did pay off.  We did well (I did) experience some bumps in the road, but those things don't really matter anymore - it's all about the love our family and friends shared on our special day.

For all future brides/brides-to-be out there here are my tips...

  • Enjoy every moment because it will go by so fast.  
  • Do things you always wanted to do for your wedding because you don't want to regret it later down the road.  We weren't going to have a videographer but I am so happy we did!
  • Be organized!! Put together a binder with tabs for vendors, wedding party, etc.  Always print out invoices and emails to stick into the binder in case something happens.  My binder was filled at the end and I am so happy I was organized it kept me insane. 
  • www.weddingwire.com a great online website/tool to help manage your wedding guests and seating chart.  No more doing it on paper it's all on your computer.  Also download the app from the app store to have on your phone so you have it with you on the go.  
  • For the first couple of months start getting some inspiration from wedding blogs and pinterest.  Be warned that you will totally get overwhelmed, I did.  After the 3rd month I picked out my colors, theme and elements that matched our venue and us a couple - once I completed this I stopped looking at all the wedding blogs/inspiration.  Its gets to be too much and then you want to change what you have going.  Stick to a plan all the way through or else you are going to go CRAZY!
  • If you are DIY bride (like I was) always get your supplies on sale or search the internet for cheaper prices.  Coupons from Michael's and Joann's really help! Look at their weekly ads to see if there's anything you will need.  Your local Craig's List is a great resource too.
  • Network around your friends/family members perhaps your sister knows a graphic designer that likes to design wedding stationary.  Or your friend's cousin's fiance works at a bakery.  By networking this really helps keeps costs down, and trust me the expenses pile up each and every week!
  • Hire a wedding coordinator and delegate a team to help set up and need be take down.  So happy I hired a wedding coordinator just to make sure everything was organized the day of.  I am very hands on and I always want things to go my way, but on your wedding day you can't be everywhere.  Your wedding coordinator will be you running around while you enjoying everything.  If you can't afford a wedding coordinator ask a friend of a friend who is very organized and has attention to detail. 
  • Plan out your budget by listing your important things first.  Pick 3 things that are important to you and then 3 other things important to you and your fiance.

I hope this helps for all you bride-to-be's out there, just a little insight of what I learned. Happy planning!

P.S. I will be posting in depth details of our wedding when I get the pictures back from the photographer.